others-how to add a spring mvc interceptor in kotlin ?
1. Purpose
In this post, I will demonstrate how to add an spring mvc interceptor in kotlin.
2. Solution
2.1 What is interceptor in spring mvc?
The Interceptor in Spring is used to intercept the execution of the controller method. You can add custom logic before and after the method execution, similar to the idea of AOP programming. In practical applications, interceptors can be used to implement authentication and authorization, logging, character encoding conversion, sensitive word filtering, etc.
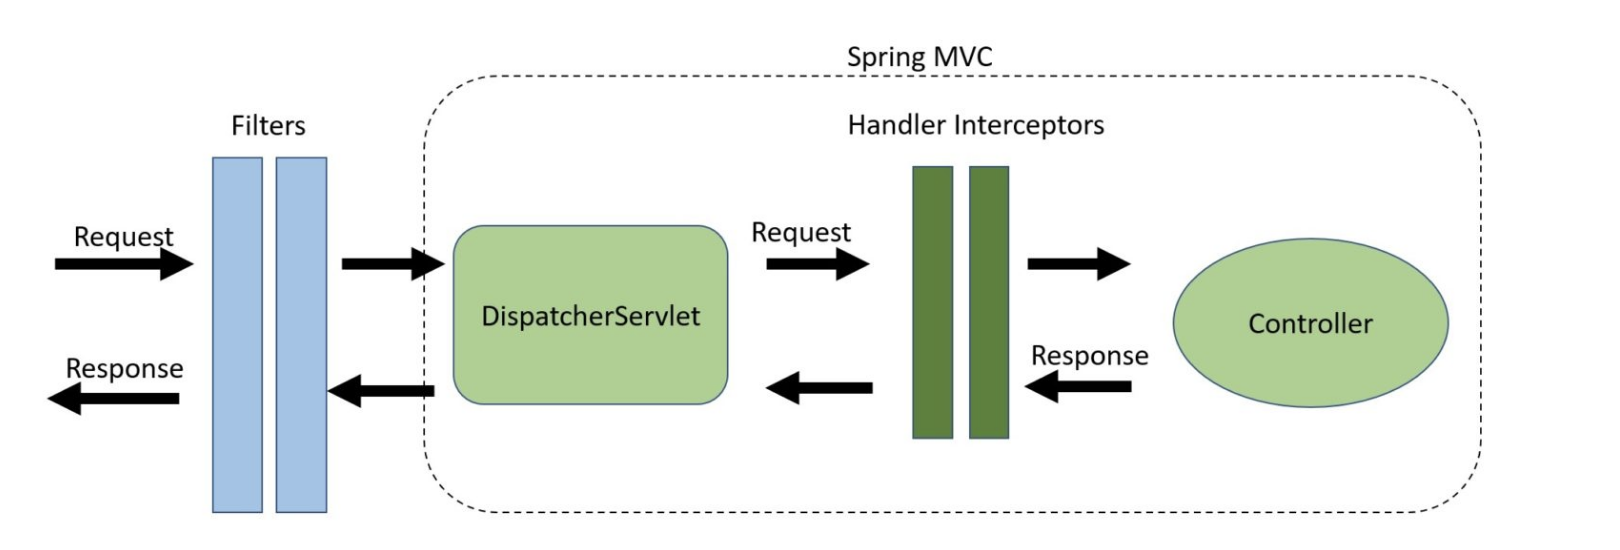
2.2 What’s the difference between the servlet filter and spring mvc interceptor?
Servlet Filters are pluggable java components that we can use to intercept and process requests before they are sent to servlets and response after servlet code is finished and before container sends the response back to the client.
According to this article :
Filters intercept requests before they reach the DispatcherServlet, making them ideal for coarse-grained tasks such as:
- Authentication
- Logging and auditing
- Image and data compression
- Any functionality we want to be decoupled from Spring MVC
HandlerIntercepors, on the other hand, intercepts requests between the DispatcherServlet and our Controllers. This is done within the Spring MVC framework, providing access to the Handler and ModelAndView objects. This reduces duplication and allows for more fine-grained functionality such as:
- Handling cross-cutting concerns such as application logging
- Detailed authorization checks
- Manipulating the Spring context or model
2.3 How to write an interceptor in spring mvc with kotlin?
2.3.1 Create a kotlin spring boot project
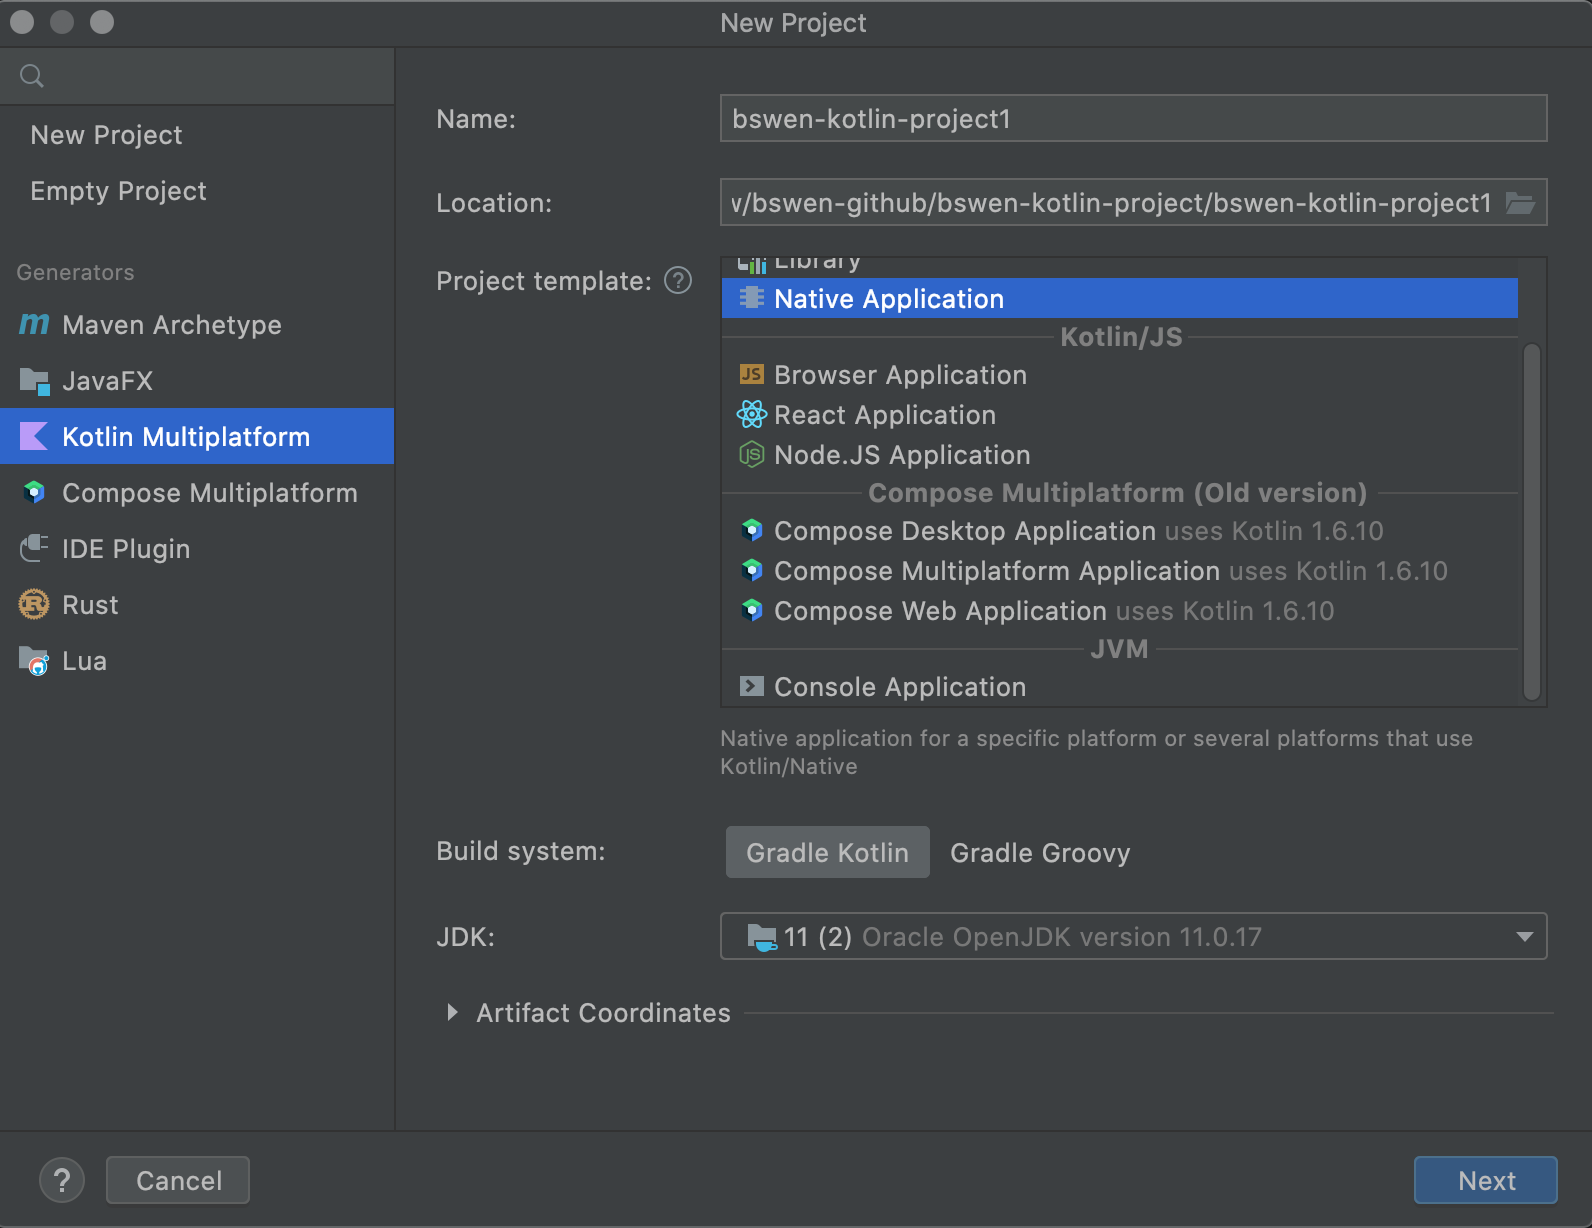
Open your IntelliJ IDEA, click to create a new project as follows,Juse the menu to create a new project and select “Kotlin Multiplatform App”. That will create the basic structure for you
2.3.2 Add a spring WebMvcConfigurer configuration class
WebMvcConfigurer is a way of spring internal configuration, using JavaBean instead of traditional xml configuration; you can also customize the extended configuration class, and the implementation method is to implement the WebMvcConfigurer interface; WebMvcConfigurer is actually an interface, and the specific configuration is determined by the implementation class.
At first, we should create a Config class:
import org.springframework.beans.factory.annotation.Autowired
import org.springframework.context.annotation.Configuration
import org.springframework.web.servlet.config.annotation.InterceptorRegistry
import org.springframework.web.servlet.config.annotation.WebMvcConfigurer

@Configuration
class WebConfig : WebMvcConfigurer {
    @Autowired
    lateinit var myInterceptor: MyInterceptor;

    override fun addInterceptors(registry: InterceptorRegistry) {
        super.addInterceptors(registry)
        registry.addInterceptor(myInterceptor);
    }
}
}
2.4.3 Write an spring mvc interceptor in kotlin
then add a interceptor:
package com.example

import org.slf4j.Logger
import org.slf4j.LoggerFactory
import org.springframework.stereotype.Component
import org.springframework.web.servlet.HandlerInterceptor
import javax.servlet.http.HttpServletRequest
import javax.servlet.http.HttpServletResponse

@Component
class SwInterceptor: HandlerInterceptor {
    val Any.logger: Logger
        get() = LoggerFactory.getLogger(this.javaClass)

    override fun preHandle(request: HttpServletRequest, response: HttpServletResponse, handler: Any): Boolean {
        logger.info("prehandle called.")
        return super.preHandle(request, response, handler)

    }
}
2.4.4 Write an spring mvc controller in kotlin
add a controller:
package com.example.controllers

import com.example.domain.Message
import org.slf4j.Logger
import org.slf4j.LoggerFactory
import org.springframework.web.bind.annotation.GetMapping
import org.springframework.web.bind.annotation.RestController

@RestController
class MessageController {
    val Any.logger: Logger
        get() = LoggerFactory.getLogger(this.javaClass)

    @GetMapping
    fun index(): List<Message> {
        logger.info("got list request")
        var result = listOf(
            Message("1","hello1"),
            Message("2","Object"),
            Message("3","Privot"),
        )
        return result
    }
}
2.4.5 Add config properties
open src/main/resources/application.properties
server.servlet.context-path=/msg
server.port=8081
2.4.6 Test the application
run the app, visit the controller using curl:
➜  api-messages git:(master) ✗ curl http://localhost:8081/msg/
[{"id":"1","text":"hello1"},{"id":"2","text":"Object"},{"id":"3","text":"Privot"}]%
➜  api-messages git:(master) ✗
got this:
2022-12-09 16:14:18.815  INFO 88927 --- [nio-8081-exec-1] o.s.web.servlet.DispatcherServlet        : Initializing Servlet 'dispatcherServlet'
2022-12-09 16:14:18.817  INFO 88927 --- [nio-8081-exec-1] o.s.web.servlet.DispatcherServlet        : Completed initialization in 2 ms
2022-12-09 16:14:18.840  INFO 88927 --- [nio-8081-exec-1] com.example.interceptors.MyInterceptor   : prehandle called.
It works!
3. The code
You can get the code from github: https://github.com/bswen/bswen-kotlin-project
4. Summary
In this post, I demonstrated how to add a spring mvc interceptor in kotlin . That’s it, thanks for your reading.