others-how to add context menu to recyclerview in android native app ?
1. Purpose
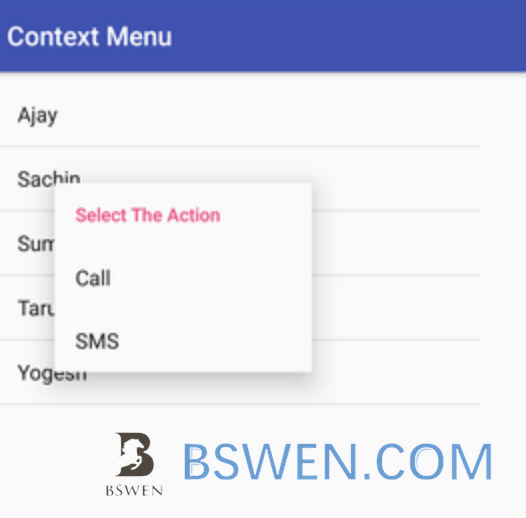
In this post, I would demo how to add context menu to recyclerview in android native app. The result is just as follows:
2. Environment
- Mac OS 10.15
- Android Studio
- Java 1.8
3. The solution
3.1 Step #1: Create a fragment
Fragment is just a piece of UI that can be loaded into an activtity, it’s more flexible and lightweight than activities. You can just follow this instructions to create a fragment in your app.
After creation, we have an empty fragment like this:

3.2 Step #2: Create a recyclerview in the fragment
RecyclerView makes it easy to efficiently display large sets of data. You supply the data and define how each item looks, and the RecyclerView library dynamically creates the elements when they’re needed.
As the name implies, RecyclerView recycles those individual elements. When an item scrolls off the screen, RecyclerView doesn’t destroy its view. Instead, RecyclerView reuses the view for new items that have scrolled onscreen. This reuse vastly improves performance, improving your app’s responsiveness and reducing power consumption.
You can follow these instructions to create a recyclerview in android, and here is an example app with recyclerview.
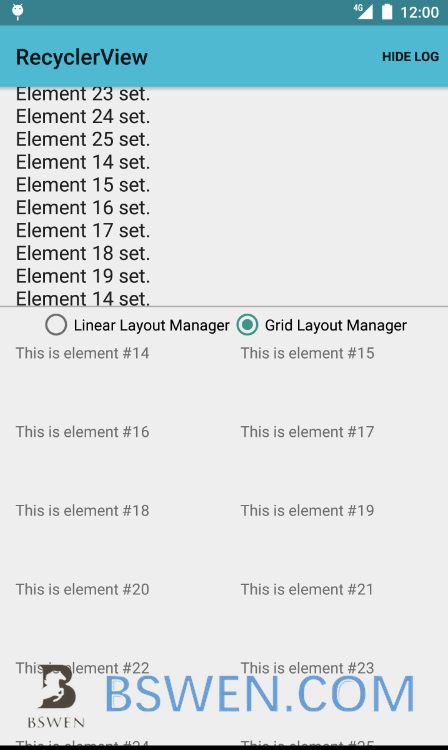
After creation, we get result like this:
3.3 Step #3: Create context menu for the recyclerview
Before start, we should know that the total process of adding a context menu and do actions according to the menu selected by users is just as following picture shows(from this document):
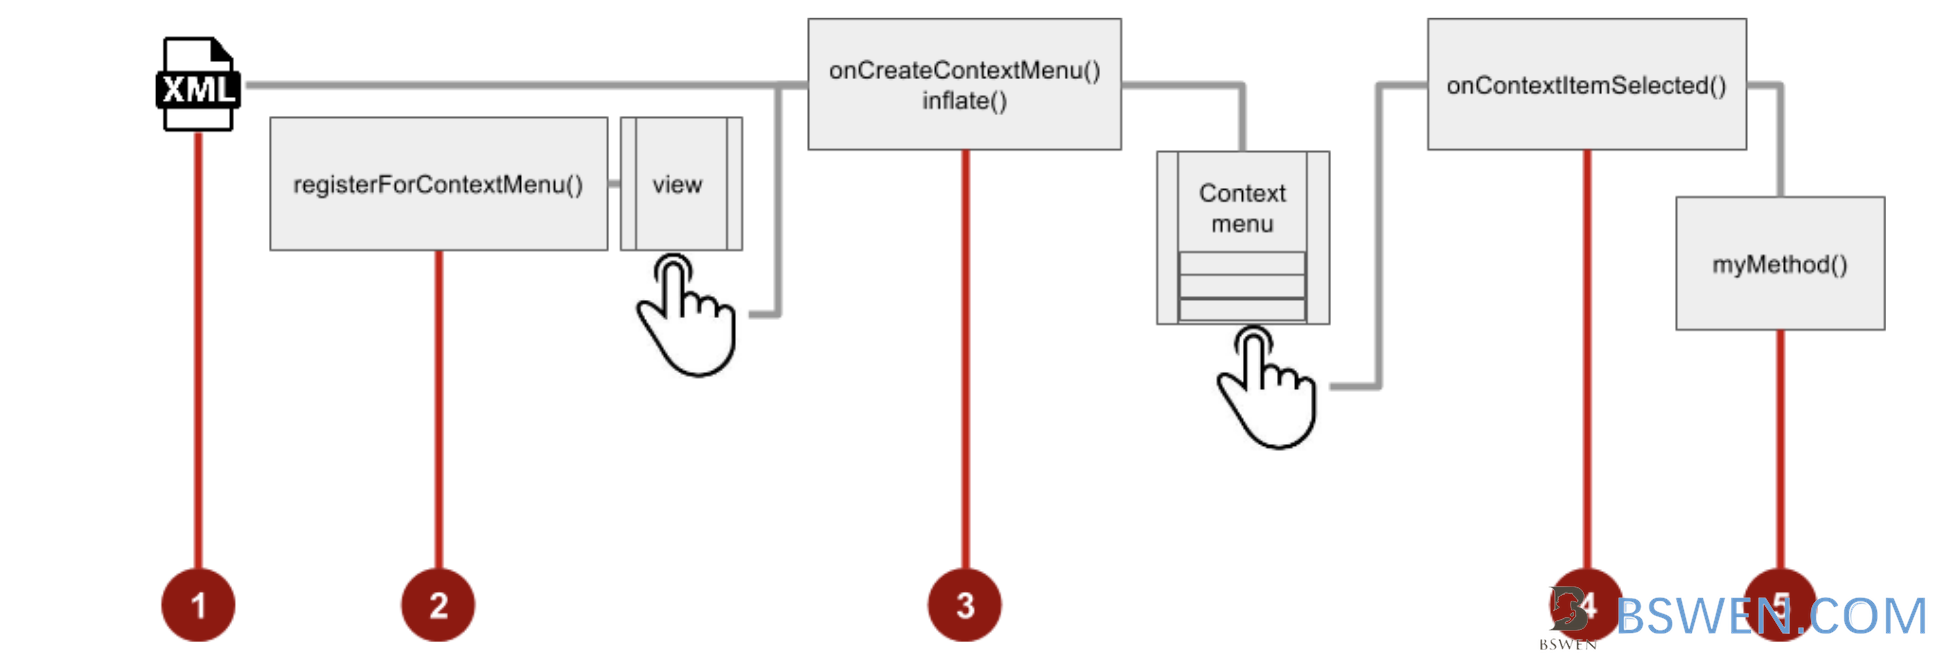
The detail steps are:
- Create an XML menu resource file for the menu items. Assign appearance and position attributes as described in the previous section for the options menu.
- Register a
Viewto the context menu using theregisterForContextMenu() method of theFragmentclass. - Implement the
onCreateContextMenu()method in yourFragmentto inflate the menu. - Implement the
onContextItemSelected()method in yourFragmentto handle menu-item clicks. - Create a method to perform an action for each context menu item.
3.3.1 Tell the fragment that we have a context menu
We should tell fragment that we have a context menu for our recyclerview when the fragment is created.
    @Override
    public View onCreateView(LayoutInflater inflater, ViewGroup container,
                             Bundle savedInstanceState) {
        // Inflate the layout for this fragment
        View root = inflater.inflate(R.layout.fragment_demo, container, false);

        //do some init job here

        registerForContextMenu(recyclerView);//for context menu

        return root;
    }
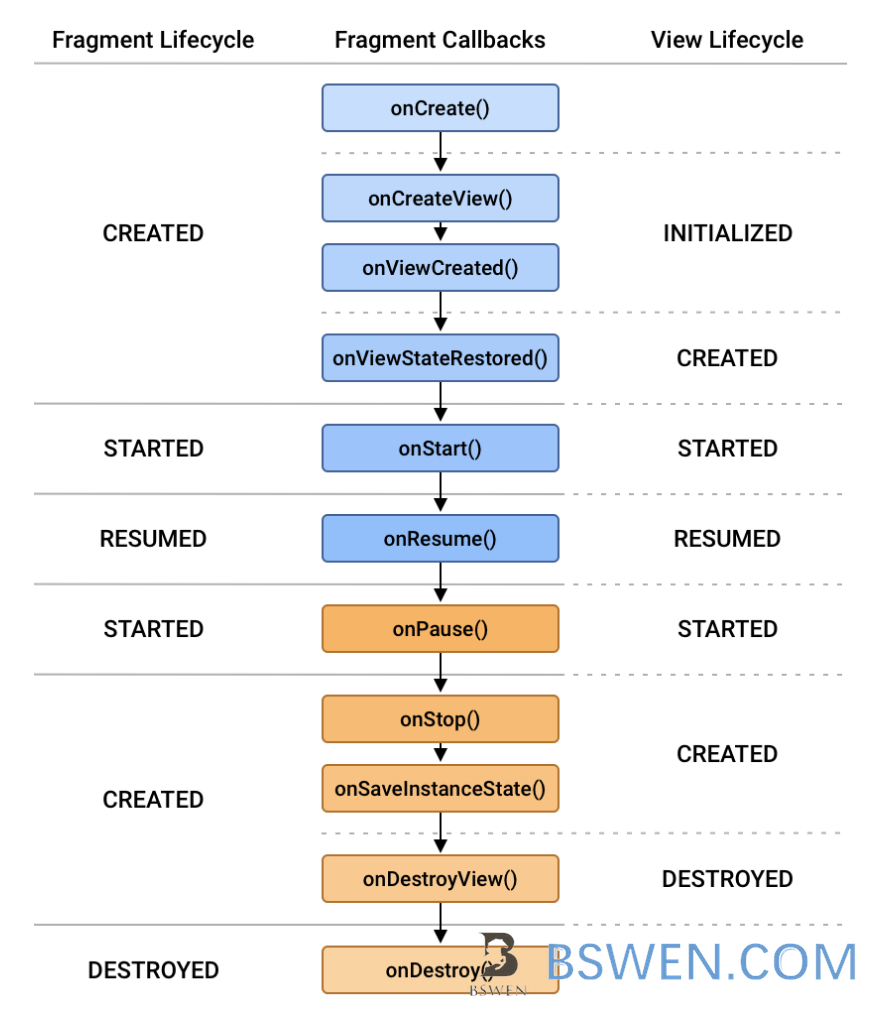
According to this document about Fragment lifecycle, the onCreateView is called when the fragment is initialized:
The registerForContextMenu function’s usage is as follows:
Registers a context menu to be shown for the given view (multiple views can show the context menu). This method will set the OnCreateContextMenuListener on the view to this fragment, so onCreateContextMenu(android.view.ContextMenu, android.view.View, android.view.ContextMenu.ContextMenuInfo) will be called when it is time to show the context menu.
3.3.2 Tell fragment how to create the context menu
Now the fragment knows there exists a context menu, but it does know how to create it, we should tell it in the onCreateContextMenu function:
    @Override
    public void onCreateContextMenu(ContextMenu menu, View v, ContextMenu.ContextMenuInfo menuInfo) {
        MenuInflater inflater = getActivity().getMenuInflater();
        inflater.inflate(R.menu.menu_demo_context, menu);
    }
In the above code, we create an inflater, and then use it to inflate our menu with a menu resouce: R.menu.menu_demo_context, we should create the file in src/main/res/menu/menu_demo_context.xml:
<menu xmlns:android="http://schemas.android.com/apk/res/android"
      xmlns:tools="http://schemas.android.com/tools"
      tools:ignore="AppCompatResource">
    <item android:id="@+id/menu_delete"
          android:showAsAction="always"
          android:title="@string/delete" />
</menu>
We just create one menu with id menu_delete, you can create as many as you want.
3.3.3 Tell fragment how to action when user selects a context menu
What to do when user clicks a context menu in the fragment? we should implement the onContextItemSelected function in the fragment, which would tell the fragment what to do when users click the context menu.
    @Override
    public boolean onContextItemSelected(MenuItem item) {
        Item selectedItem = adapter.getSelectedItem();
        LogUtils.debug("selected "+selectedItem.getContent());
        switch (item.getItemId()) {
            case R.id.menu_delete://should match the id in the context menu file
                doDelete(selectedItem);
        }
        return super.onContextItemSelected(item);
    }

    private void doDelete(Item selectedItem) {
        LogUtils.debug("delete "+selectedItem.getContent());
    }
In the above code, when user click the context menu, we get the selected item from the adapter, then check which menu users clicked, then perform action by the menu id.
But how to get the selected item? this should be implemented in the adapter of the recyclerview.
The adapter is the piece of code that will connect our data to our RecyclerView and determine the ViewHolder which will need to be used to display that data.
What is the relationship between adapter and recyclerview? The following picture captured from this article shows the detail relationship between the recyclerview/adapter/viewholder and datasource.
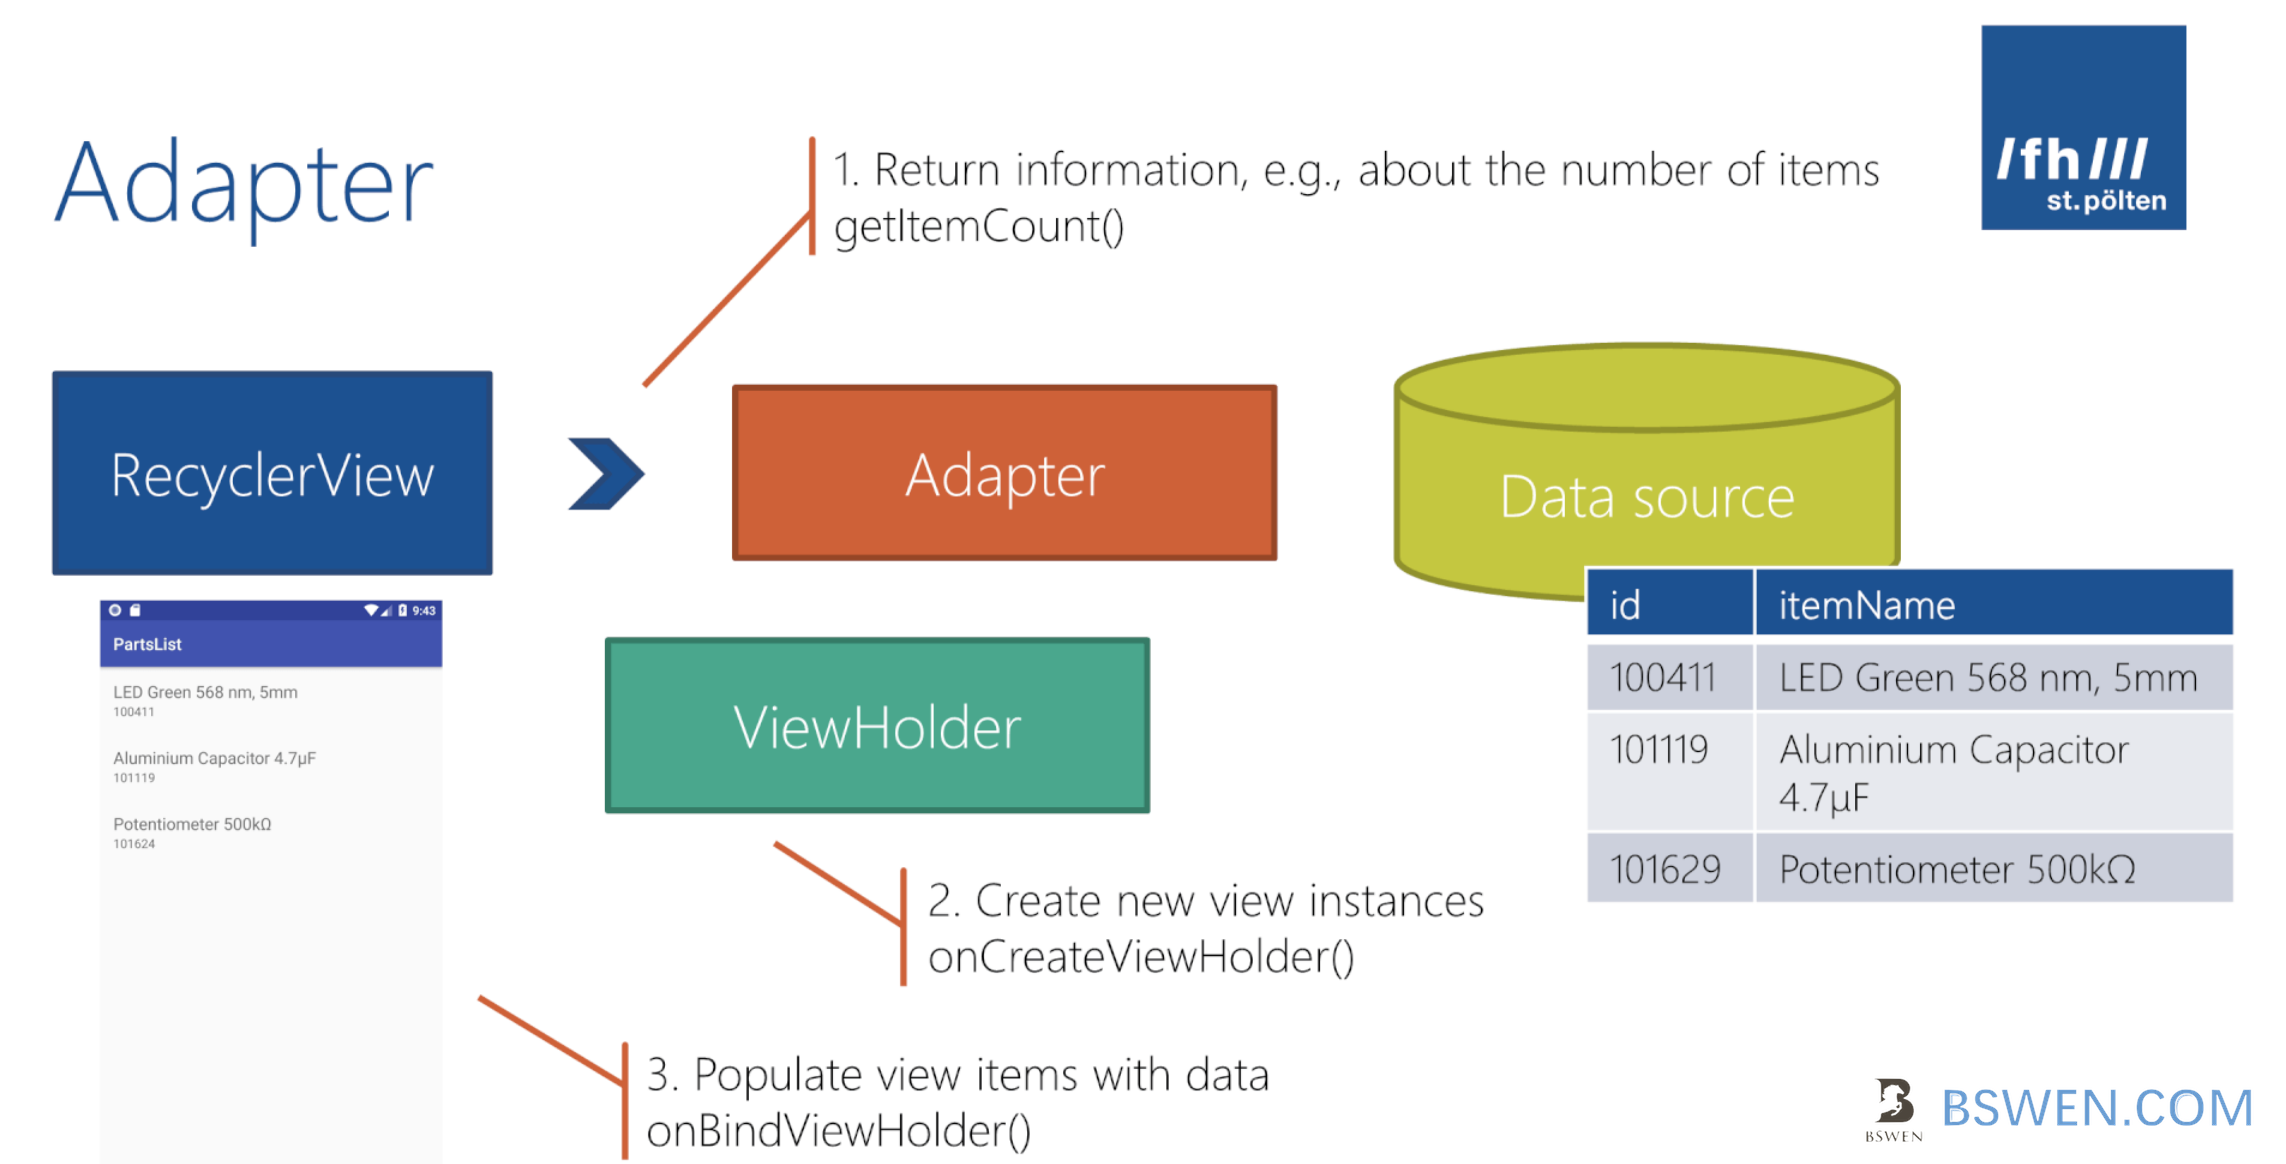
You can refer to this document on basics about the adapter/recyclerview and viewholder.
3.3.4 implement getSelectedItem in adapter
We should implement a function named getSelectedItem in adapter to be called in the fragment.
    private int currentPos;//current selected position.
    private List<Item> itemList; //container for our data

    public Item getSelectedItem() {
        if(currentPos>=0 && itemList!=null && currentPos<itemList.size()) {
            return itemList.get(currentPos);
        }
        return null;
    }
3.3.5 Record the selected position in the adapter when using long click the item
When user long click the item view in the adapter, we should record the selected postion in the recyclerview’s adapter ,just as follows:
Create an inner class named CustomViewHolder in your adapter, and make it implements the View.OnLongClickListener:
   class CustomViewHolder extends RecyclerView.ViewHolder implements View.OnLongClickListener {
        protected TextView tvItemContent;

        public CustomViewHolder(View view) {
            super(view);
            this.tvItemContent = (TextView)view.findViewById(R.id.tv_item_content);
            view.setOnLongClickListener(this);
        }

        @Override
        public boolean onLongClick(View v) {
            currentPos = getAbsoluteAdapterPosition(); //key point, record the position here
            return false;
        }
   }
The key point is when user long clicked the item view , we get current location by calling getAbsoluteAdapterPosition:
Returns the Adapter position of the item represented by this ViewHolder with respect to the
RecyclerView’sRecyclerView.Adapter.
If you are wondering about getAdapterPostion() and getAbsolutionAdapterPostion(), here is the explaination:
This method(getAdapterPostion) is deprecated. This method(getAdapterPostion) is confusing when adapters nest other adapters. If you are calling this in the context of an Adapter, you probably want to call
getBindingAdapterPosition()or if you want the position asRecyclerViewsees it, you should callgetAbsoluteAdapterPosition().
3.4 Build and run the app
We get this:
Now it works!
4. Summary
In this post, I demonstrated how to add context menu with custom actions to a recyclerview inside a fragment.