springboot 2 with JPA pagination example
1. Introduction
This post would demo how to do pagination operations by using springboot 2 and JPA.
2. Environments
- SpringBoot 2.0.2+
- spring-boot-starter-jpa
- spring-boot-starter-web
- MySQL connector java
- Lombok
- Java 1.8+
3. The Pom.xml
spring boot version:
<dependencyManagement>
    <dependencies>
        <dependency>
            <groupId>org.springframework.boot</groupId>
            <artifactId>spring-boot-dependencies</artifactId>
            <version>2.0.2.RELEASE</version>
            <type>pom</type>
            <scope>import</scope>
        </dependency>
    </dependencies>
</dependencyManagement>
all dependencies:
<dependency>
    <groupId>mysql</groupId>
    <artifactId>mysql-connector-java</artifactId>
    <scope>runtime</scope>
</dependency>
<dependency>
    <groupId>org.springframework.boot</groupId>
    <artifactId>spring-boot-starter-test</artifactId>
    <scope>test</scope>
</dependency>
<dependency>
    <groupId>org.projectlombok</groupId>
    <artifactId>lombok</artifactId>
    <optional>true</optional>
</dependency>
<dependency>
    <groupId>org.springframework.boot</groupId>
    <artifactId>spring-boot-starter-web</artifactId>
</dependency>
4. The dependencies explanation
4.1 The lombok
The lombok is an IDE plugin to help you do some boliertemplate jobs. In this post we use the lombok to generate the getter/setter of the domain object.
You can refer to this post to learn how to use lombok.
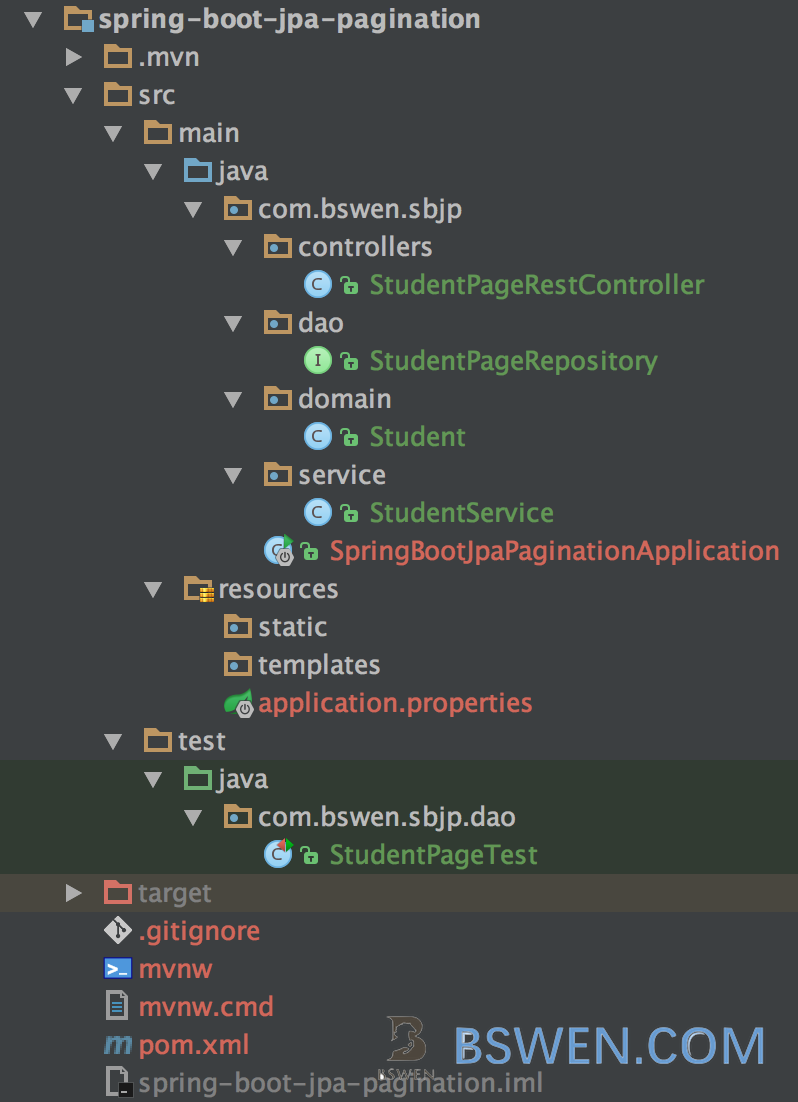
5. The project layout

6. The database , table and initial data
For demo purpose, I setup one database in localhost as follows:
CREATE DATABASE `test` CHARACTER SET utf8 COLLATE utf8_bin;There is a table ‘tbl_student’ in both of the databases:
CREATE TABLE `tbl_student` (
  `ID` int(10) NOT NULL AUTO_INCREMENT,
  `NAME` varchar(100) NOT NULL,
  `BRANCH` varchar(255) NOT NULL,
  `PERCENTAGE` int(3) NOT NULL,
  `PHONE` int(10) NOT NULL,
  `EMAIL` varchar(255) NOT NULL,
  PRIMARY KEY (`ID`)
) ENGINE=InnoDB AUTO_INCREMENT=2 DEFAULT CHARSET=utf8;
And insert five records into that table:
INSERT INTO `tbl_student` (`ID`, `NAME`, `BRANCH`, `PERCENTAGE`, `PHONE`, `EMAIL`)
VALUES
    (1, 'jack', 'it', 20, 1211232, '[email protected]'),
    (2, 'mark', 'dev', 30, 333, '[email protected]'),
    (3, 'tony', 'dev', 2, 444, '[email protected]'),
    (4, 'nancy', 'dev', 23, 788, '[email protected]'),
    (5, 'tommy', 'it', 32, 2423, '[email protected]'),
    (6, 'tom', 'it', 23, 11, '[email protected]'),
    (7, 'Aka', 'dev', 1, 2, '[email protected]'),
    (8, 'al', 'dev', 2, 3, '[email protected]'),
    (9, 'ben', 'dev', 3, 4, '[email protected]'),
    (10, 'Mike', 'it', 5, 6, '[email protected]'),
    (11, 'Cow', 'it', 3, 23, '[email protected]');
Here we insert 11 records to test the pagination, we need two pages, each page with 10 records.
7. The domain class Student
import lombok.Data;
@Data
@Entity
@Table(name="tbl_student")
public class Student {
    @Id
    @GeneratedValue(strategy= GenerationType.IDENTITY) ////auto increment
    private long id;
    private String name;
    private String branch;
    private int percentage;
    private int phone;
    private String email;

}- Here we use the lombok @Data annotation to generate getter/setter and constructors for the Student class.
- We define the id property as the @Id of the table ,and specify the GenerationType.IDENTITY to it, which means the id is auto-increment.
- We define the table name by @Table annotation
7. The app codes
7.1 the application.properties
Supply these properties in your application.properties:
spring.datasource.driverClassName = com.mysql.jdbc.Driver
spring.datasource.url = jdbc:mysql://localhost:3306/test?useUnicode=true&characterEncoding=utf-8
spring.datasource.username = root
spring.datasource.password = 123456
7.2 The StudentPageRepository interface
The dao.StudentPageRepository is as follows:
public interface StudentPageRepository extends PagingAndSortingRepository<Student,Long> {
}- The class StudentPageRepository only extends from the PagingAndSortingRepository ,there is no need to define any other methods to implement the pagination operations.
There are two methods in the PagingAndSortingRepository:
- Iterable
findAll(Sort var1); - sort by the var1 rule and return an Iterable
- sort by the var1 rule and return an Iterable
- Page
findAll(Pageable var1); - do pagination and sorting by the var1 rule and return Page
- do pagination and sorting by the var1 rule and return Page
Notice that there are sort criteria in the Pageable object.
7.3 The Testcase
The StudentPageTest class would test the pagination operations:
@RunWith(SpringRunner.class)
@SpringBootTest
public class StudentPageTest {
    @Autowired
    private StudentPageRepository studentPageRepository;

    @Test
    public void testPage1() { // test the pagination only
        int pageSize = 10;
        Pageable pageable = PageRequest.of(0,pageSize);
        Page<Student> students = studentPageRepository.findAll(pageable);
        assertEquals(students.getSize(),pageSize);
    }

    @Test
    public void testPageAndSort() { // test the pagination with sort
        int pageSize = 10;
        Pageable pageable = PageRequest.of(0,pageSize,Sort.Direction.ASC,"id"); //order by id asc
        Page<Student> students = studentPageRepository.findAll(pageable);
        assertEquals(students.getSize(),pageSize);
        assertEquals(students.getContent().get(0).getId(),1);//the min id should be 1
    }
}
Run the testcase, we got a green bar.

7.4 The RestController and the Service layer
We want to test the pagination with the spring mvc RestController
We create a service to interact with the RestController
@Service
public class StudentService {
    @Autowired
    private StudentPageRepository studentPageRepository;

    public Page<Student> listByPage(Pageable pageable) {
        return studentPageRepository.findAll(pageable);
    }
}
Then we create a RestController:
@RestController
@RequestMapping("/studentsApi")
public class StudentPageRestController {
    @Autowired
    private StudentService studentService;

    @RequestMapping(value = "/queryByPage", method = RequestMethod.GET)
    public Page<Student> queryByPage(Pageable pageable) {
        Page<Student> pageInfo = studentService.listByPage(pageable);
        return pageInfo;
    }
}
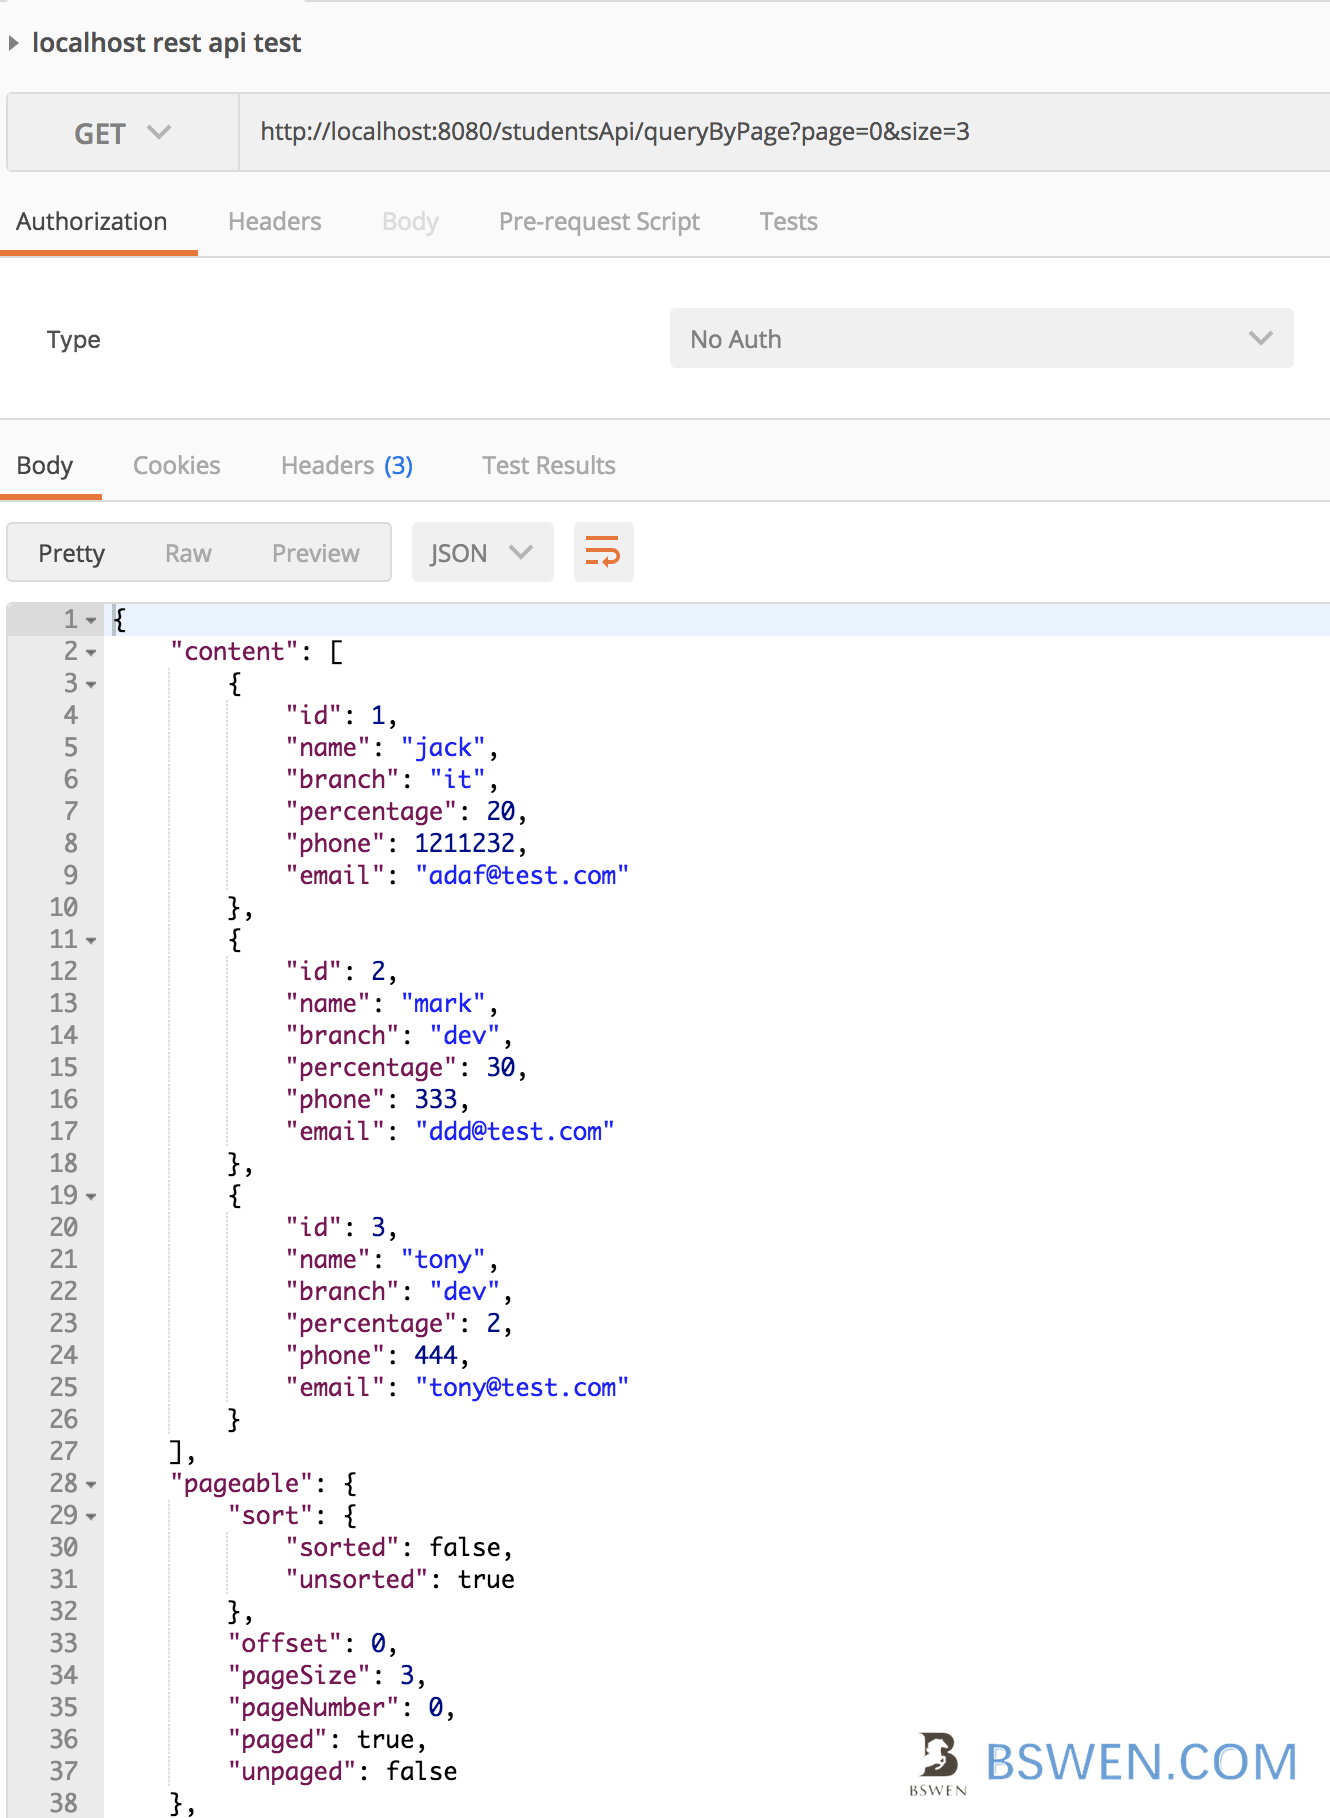
Run the app:
mvn springboot:runTest with the postman like this:

It’s so easy, do you think so?
The example source code has been uploaded to github, you can visit here to view the example source codes.